Fast and Fresh Beauty Routine with Covergirl

It's summer, and if you're like me, your skin might be a touch oilier than it usually is. Covergirl has your back, or your skin, with Clean Matte BB Cream. Get flawless coverage and stay shine-free all day. It's oil free and it won't clog your pores too. 


If you're into dramatic lashes but you don't have the time or skills for false lashes (like me, unfortunately), then Covergirl's Super Sizer Fibers mascara is for you. Get tons of volume and length with just a few swipes of the brush. Built in fibers create a falsies effect for you, easy peasy.

If you're in Canada, CLICK HERE to get a printable $1.00 off coupon.

Disclosure: The Super Sizer Fibers mascara and Clean Matte BB Cream were provided by Covergirl through BzzAgent for consideration. All opinions posted are honest and truthful- 100% real!

Loreal Root Cover Up in Light to Medium Brown

I was excited to try Loreal's Root Cover Up. I am a first time mom who colours her own hair. Sometimes, I don't have time or I'm too busy to take care of my roots. Root Cover Up is a great idea, spray on temporary product to conceal roots. I love the can's teal colour, it's cute and user friendly. Just shake, spray and let dry, and poof! Roots covered up!


Unfortunately, I'm not sure if they made it to cover *just* grays, because it does almost nothing to my roots. My hair is naturally black, with some gray here and there and coloured light brown. I chose Light to Medium Brown, and my hair matches the colour on the can. When sprayed on, the product just makes my hair feel gummy. It does not conceal my black roots at all. It only seems to coat it in a slightly lighter colour, nothing like the colour on the can.

I really, really wanted to like to Root Cover Up, as it would definitely make my hair look better in between colouring. Sad to say, it did not work for me.

Disclosure: The Loreal Root Cover Up in Light to Medium Brown was provided by Loreal through Influenster for consideration. All opinions posted are honest and truthful- 100% real!

Lise Watier HydraForce Hydra-Protective Comforting Creme

This winter was relatively mild by Canadian standards, but whenever the mercury drops, so does the humidity. It wreaks  havoc on my skin. I was born and raised in a tropical country, where it doesn't get any lower than 20 C. We'd go on vacation to colder places during winter, but my skin was never exposed long term to winter. The coldest place I've ever been to is Harbin, China, -40 C with windchill. Needless to say, I wasn't there too long.

Growing up, I had combination skin, normal with an oily T-zone. That's pretty much how it is most of the year. During winter, my skin just dries up. My oily T-zone will become normal, borderline dry, and the rest is just parched. Don't get me started on my cuticles, they end up looking like dry cracked desert land and it turns me into a compulsive skin picker, but that's a story for another day.


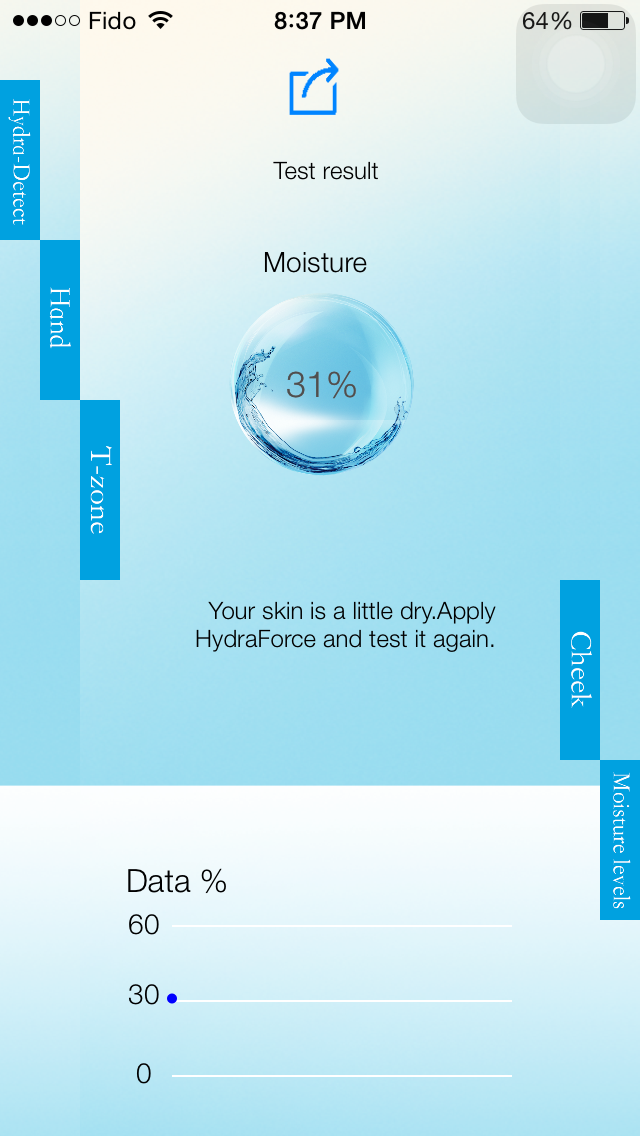
This is the kit Glam Sense and Lise Watier sent. This super cute skin testing device came along with a full size jar of HydraForce Hydra-Protective Comforting Creme to test and review.  It plugs into a smartphone's headphone jack and measures skin's moisture level on the Hydra-Detect app. Let's take a look at my results.


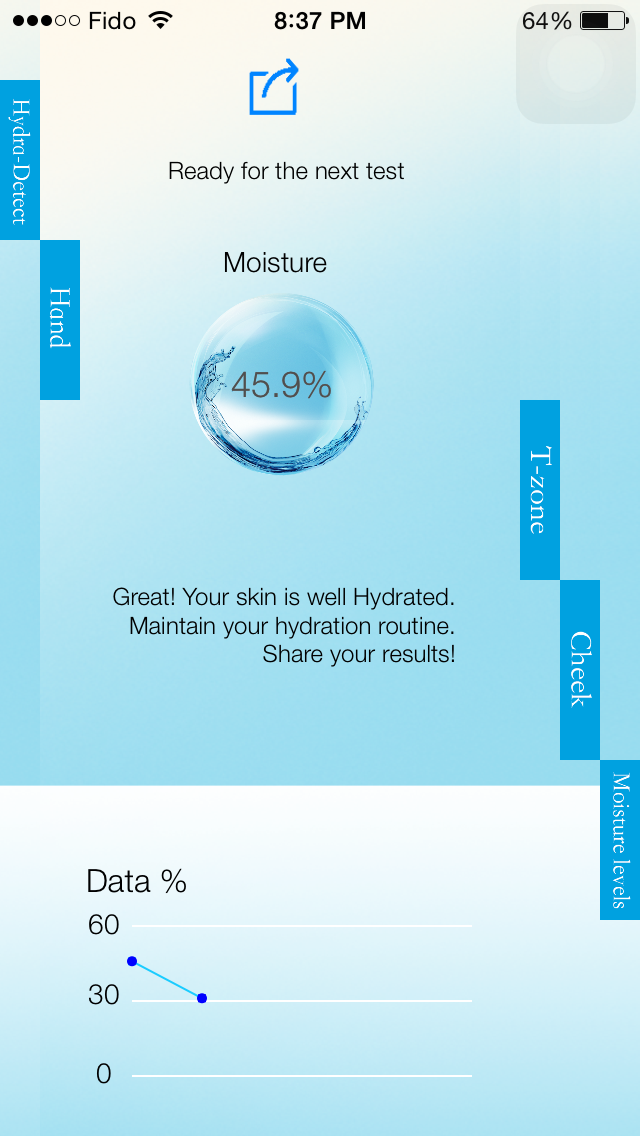
Those were the numbers for my left hand, forehead and left cheek, respectively. I did what the app told me to do (I try to follow instructions as best as I can, lol) and applied HydraForce. Hydra-Protective Comforting Creme has a floral scent I like. Initially, it's a little strong and I think some may not like it. It would probably have been better to have a much milder scent, or even go fragrance-free. The texture, I love. It's light and reminds me of a gel-creme. It absorbs quickly too. 

After waiting a few seconds for my skin to soak up the Comforting Creme, I tested the suggested areas again. Behold, my face was more hydrated! According to the app, my hand was still a little dry, but the moisture percentage did go up. 


More than those scores, my skin feeling softer and more supple tells me that it's more hydrated. I'm liking the boing-boing effect I'm having now that I've used it for about three weeks. No more talking and then wincing when my face feels tight. Thank you Glam Sense and Lise Watier for sending me this HydraForce kit and saving my skin!


Disclosure: The HydraForce Hydra-Protective Comforting Creme was provided by Lise Watier through GlamSense for consideration. All opinions posted are honest and truthful- 100% real!

truBlend is tru-ly Good!

I'm usually wary of purchasing or choosing foundation online, because what you see (on your screen) might not be what you get. That was my first dilemma when I chose the Cover Girl foundation through BzzAgent.  I tried to look for swatches online, and chose my shade. I prayed that it would match, and thank goodness, when it arrived, it was good!

tru Blend applied nicely. The formula was just the right texture, not too thick and not too thin. Perfect for Goldilocks. It applied smoothly, and since I got the right shade, it looked very very natural. I've used fingers, a sponge, a foundation brush, a stippling brush, and a flat top kabuki to apply tru Blend. All of them worked. The sponge, foundation brush and kabuki gave more coverage, while the stippling brush gave a lighter, buildable coverage. The fingers were easiest, and because of the added body warmth from the finger tips, made application easy. One less tool to wash as well.


I'm glad that they packaged this in a pump bottle. A number of brands and products are too, but you'd be surprised that there are still some liquid foundations in regular bottles. (Check out the bottle of CG clean Oil Control in the photo. It looks like it has a screw-type cap. Me no likey.) The pump prevents contamination and keeps the product fresh. The pump also helps you measure how much product you use. For example, for lighter coverage I use only one pump applied evenly and blended well. It's much more convenient, and helps me skip guessing and constantly taking out product.

Now that it's winter, I normally skip powder foundation and use liquid. I only use powder to finish or keep oilies at bay. I find that truBlend, although not marketed as such, was moisturizing enough for me this mild winter without slathering on moisturizer.

Overall, I believe Covergirl's truBlend is a good foundation at the drugstore level. It's an affordable product that work well.


Disclosure: The truBlend liquid foundation was provided by Covergirl through BzzAgent for consideration. All opinions posted are honest and truthful- 100% real!

Full Lash Bloom

I recently received Covergirl's Full Lash Bloom by LashBlast Mascara (what a mouthful that was!) in very black. And by recently, I mean a few weeks ago.  Anyhow, Covergirl promises "touchably soft full lashes, a flake-resistant formula, and full separated volume." It also boasts being ophthalmologically test and suitable for contact lens wearers. 


Covergirl offered us a choice among four mascaras, including LashBlast Volume, LashBlast Fusion, Clump Crusher by LashBlast and my pick, Full Lash Bloom. I chose this one because hey, pink is pretty! But really, who likes crunchy lashes? I know I don't. My only gripe so far is that it's not waterproof. Otherwise, it's a decent drugstore mascara. Stay tuned for more in-depth review as I take it out for a few more spins.


Disclosure: The Full Lash bloom mascara was provided by Covergirl through BzzAgent for consideration. All opinions posted are honest and truthful- 100% real!

Goodbye Roots and Grays with Clairol's Root Touch-Up

It's no secret that I love experimenting with hair colour. Aside from going to the salon to have it done, I'm a huge DIY-er. I've used boxed hair colour and made my own "kits" with salon products. I've bleached my own hair (with varying results lol). Now, let me introduce Clairol's Nice 'N Easy Root Touch-Up kit.


I swear, this has got to be the cutest little thing ever. Included in each box are a brush, a mixing cup, colour creme and developer. The difference lies in the size, everything are minis! I really appreciate this as sometimes, when you're just doing your roots and not actually changing your hair colour or doing your whole head, the regular boxes have too much product. As with every kit, it also comes with an instruction leaflet and gloves.

The cute brush is actually pretty good quality. The bristles are nice, they're stiff with enough give. I found it fairly easy to apply the right amount for roots. There's also enough product to cover roots, unless you have something like six inch roots. You'd need a regular box of Clairol Nice 'N Easy for that. You only need 10 minutes of development time. I found that I spent more time applying than waiting! Another huge plus for me. It covered my roots and my pesky greys well. Yup, I'm only in my 20's but I have a ton of greys.

I chose Light Golden Brown. It goes with the 6G and 6.5G colours across Clairol's family of boxed hair colour, and I'm sure it's comparable with many, many other brands' colours. Clairol says it seamlessly matches salon colour as well. With this handy dandy kit, you'd be able to extend time between salon visits too, if that's your cuppa tea.

Disclosure: The Clairol Nice 'N Easy Root Touch-Up kit was provided by Clairol through BzzAgent for consideration. All opinions posted are honest and truthful- 100% real!

Canada, Eh?

Yes, I'm still alive! So much has happened in the time I've been missing, but it's been such a roller coaster ride. The main adventure, I believe, would be my relocation to Canada. Exciting? Sometimes! In the four months I've been here, I became a survivor of The Longest Winter Ever, slipped on ice at least thrice, practically destroyed my MacBook Pro (poor baby), and tried snowboarding. There are moments when I really, really miss my dad and my family, my dogs and my friends back home. But I've gained more experiences and new friends here, and I do not regret my decision one bit right now.

from

I have some ideas for Unicorns Dream but I'll need to revive my MacBook Pro to regain access to them. Hopefully I can execute them in a timely and decent manner. So, until then!

Calling All Bibliophiles!

National Book Store is having their warehouse sale this weekend!


Go to the Quezon Avenue National Book Store on November 14-19, 10 AM to 7 PM to get up to 80% off books and other products. I would if I could, but I couldn't!!

One of Many Ways to Help: The Philippine Red Cross

From the PRC Facebook page

The Philippine Red Cross. Not only do they provide relief after calamities and other events, they also conduct rescue operations. There are many ways to donate, as listed on their webpage. You can use your credit card or atm, make a cash or check deposit or through SMS. I made my family's small donation using Paypal on this page, where you may choose where you want your donation to go. We earmarked our contribution for Supertyphoon Yolanda/Haiyan.

It doesn't matter how much you give, as long as it is sincere. I believe they are also looking for volunteers, if you want to help and give your time. Check out their Facebook page for more information.

Please help if you can! A drop of water may seem insignificant, but remember that oceans are made of many, many drops! (Does that even make sense?) 

Together we can help save and rebuild lives.

Love Flakes with Color Combos CTW511

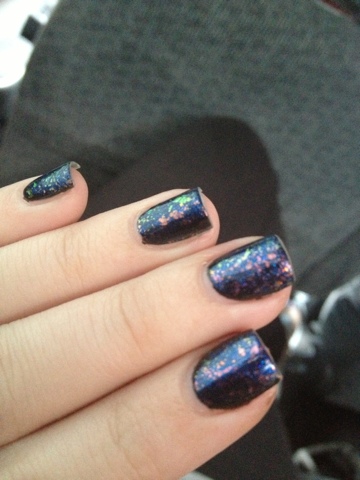
Color Combos CTW511 is a bright blue jelly with blue micro glitter and flakies. What are flakies, you ask? Flakies are little bits of iridescent film that flash different colours when hit with light. Interesting, eh? Check it out below.


The blue jelly is Color Combos CTW511 is very translucent. The base has to be, so that the flakies will show. When I first tried it, I had no idea what flakies were, so I just painted it on like regular polish. I hated it. With three coats, it looked soooo horrible. Finally, after a little bit of going around the internet, I learned that you had to paint flakies over a dark polish. I did, over black, and BOOM. Lovely! 


This particular polish's flakies flash neon green, violet, fuschia, orange and red depending on the light. It was a little difficult for me to capture it on camera, but I tried. 

The formula of the polish was great. Just the right consistency for me. The flakies painted on well too, with even distribution and no clumping at all. I also like Color Combos' brushes. They're a little similar to OPI's. These ones are a bit flat, but not as wide as OPI's. 


I bought my bottle of Color Combos at Sasa in Hong Kong. It contains 10ml and is made in France. I can't remember how much it was exactly, but it was something like a 2 for $15 or 2 for $25 deal. 

Bye, Blondie! Liese Bubble Hair Color in Cassis Berry

I finally said goodbye to my dark blonde, light brown-ish hair I dubbed Blondie. I had a box of Liese Bubble Hair Color from my last trip to Hong Kong, so I decided to use that. The colour was Cassis Berry and it's described in the Kao Singapore website as "A glamorous pink with a touch of brown." It's made in Japan by the Kao Corporation. I've used this twice in the past and I loved how fun and easy Liese Bubble Hair Color was.


This version was made to be sold in Hong Kong and Singapore so it was in a dual language box, with Chinese and English. The kit came with Solutions 1 and 2, hair lotion, the foamer cap (which produces the bubbles, yay!), a pair of gloves and the instruction sheets. There were actually three versions, Chinese, English and Japanese! I thought it was really cute. Anyway...

Here's the part of the box which shows you what colour to expect depending on your original hair before colouring. My Blondie hair was veeery similar to the Very light colour hair they had pictured. More on the results later.


See the next photo for the gist of the instructions. Almost like shampooing, actually. It's really fun and I find that it colours evenly, with less effort than using the tint brush and bowl. I thought that one kit wouldn't be enough to cover my thick, long hair, but luckily it did! It wasn't as thick and foamy as when I used it in the past, as my hair was shorter then, but apparently it was enough. My whole head was Cassis Berry-ed! The hair lotion included smelled nice, wasn't greasy and my hair drank it all up.


The results! Both taken indoors with the somewhat crappy "selfie" iPhone camera. Bad lighting too, even my skin is two different shades. Should've taken some with the regular one, sorry. Unfortunately, the touch of brown came out as really brown, with the glamorous pink nowhere in sight. When it first dried I lamented the loss of my golden hair but I'm learning to love this colour. It's growing on me! Now do I recommend Liese Bubble Hair Color? Yes! Cassis Berry is also good, but they do have a number of nice shades to choose from.

I realise that the photo below doesn't do any of my hair colours justice. My Blondie hair was more golden, and my Cassis Berry hair is less red, and more brown. 


I bought my box of Liese Bubble Hair Color in Cassis Berry in Hong Kong. It was from my favourite supermarket, Wellcome. Unfortunately, I don't remember how much it cost.

NOTW: China Glaze Skyscraper

A bit sloppy, yeah? But here's China Glaze Skyscaper. Same old OPI Natural Nail Base Coat and Top Coat. I used two coats of Skyscraper here, but I didn't get the same colour in the bottle. Maybe with three coats? Maybe next time. It's a nice bluish-purple with lot's of silver microglitter. Mine shows up more purple than Scrangie's, who describes it as a deep blue jelly.


Next time, I'll do a better job painting it on so hopefully it'll look as pretty as Scrangie's. I actually looked at her swatches when I was shopping for my polish back then. :)

To M, with Love

I'm not really good at eloquently sharing what I feel... I guess this photo will sum up our entire relationship:


Happy first anniversary! I guess this would be my (electronic) paper present.

いにきたい

Always,
D

NOTW: China Glaze Nova

I swear I should stop looking at nail polish online. My first ever bottles of China Glaze were an impulse purchase. I was looking at my favourite nail sites, Scrangie and The Polish Aholic, and bam, I had two dozen bottles of China Glaze on the way. Anyway, here is what I just painted on my just nails now.


Everyone, this is China Glaze Nova. I absolutely cannot get it to show up properly on my lowly iPhone camera, but it's freaking lovely. Lot's and lot's of small silver glitter and hex holo glitter in a clear base. I cannot tell you how much I love it. So so much. I'm willing to give up One Direction for a day just for Nova. Ugh. This is two coats of Nova with OPI Natural Nail Base Coat and OPI Top Coat. It's just so beautiful. I love Nova.


Glitter is my weakness. That is all.

What's New Today: The SM Beauty Box

A few days ago I was so intrigued when my favorite beauty bloggers started posting about the SM Beauty Box. After a few clicks here, some oohs and aahs there, and maybe a bit of drooling at the photos, August 1 has arrived! My mum and dad were nice enough to drive and accompany me to SM North EDSA so I could get my grubby paws on this magical box.


We had to take a short pitstop at a bench for my dad since he was having a hypoglycemic episode. After his RBG which read 44, a piece of candy to help bring his sugar levels up, my mum went down with me to get the Beauty Box. I got one for myself, and my mum got two. She wanted to get three but I was like, hey stop, that's too much! That's why we have three boxes between us. 

They weren't kidding when they said it was limited. The ladies at the other counters told me that the stocks were all out. My mum and I got three, and there were like seven on the table when we left. So I'm not sure what time they ran out. A manager opened one up to peek, and the other ladies were all around us. The Olay lady was held up the eye cream and lash serum duo, and was like, "Ours costs P1499! Get smoother eyes in a week and better eyelashes in three days!" (I was so amused I kinda forgot to remember exactly what she said. It was something like that though.)


There's the contents in all it's glory. Fancy, isn't it? The cost of all the products in the SM Beauty Box is P4000, but they're selling it for only P799. What a steal right? That's why my mum got two of them. She told me she'll be gifting some of the stuff. 

For more details, allow me to direct you to Achi Nikki aka AskMeWhats. Click here!!! She lists every single product in the box, plus she classifies them into groups like hair, face, etc. 

I hope that if this proves to be popular, which I think it really, really is, SM and Watson's makes more Beauty Boxes so other folks can get this too. Maybe they can make this into a monthly thing, yeah? Like a subscription box, but retail.

I'm really excited to dive into this box as there are a lot of new brands for me to try. I've been wanting essence since they've been made available in Canada and the US, but I procrastinate so... It's already here so yay! I have the Opal conditioner under a shower cap and towel on my hair right now. It smells good, so we'll see how it goes!

EWYG: Lovin' the Rain!

Eat What You Grow Update 1: My baby lettuce plant is not a baby anymore! He grew out of his baby cotyledon leaves and now he's sporting a bunch of fine grown-up leaves. He looks like a fine adolescent lettuce, yeah?


Also want to mention that we both love the rainy season. I don't have to water him at all, since it rains almost everyday. And on the days it doesn't rain, I always check on him and he looks just fine. (The soil is still damp and no, we do not want to over water. Plants do drown.) He looks nice and happy now and I can't wait 'til he's big enough to harvest.

Bonus point: How many times did I say "fine"? Lol.

Garden Project: Eat What You Grow!

My family and I live in an apartment so we don't have a garden. I actually envy those of you who have plots of land and soil. I really wanted to plant and garden, so I had to make do with little pots. My mum has a bunch of ornamental plants, so I decided I wanted something edible. This is my first shot at vegetable container gardening. At the middle or end of this little series, I want to be able to eat what I planted and grew, so wish me luck!  I hope it tastes good.

I bought a packet of lettuce seeds from the garden supply store near our home. It had a nice photo of fluffy purple loose-leaf lettuce on the packet, so I thought, "Why not?" The plastic pot I found at home, as well as the sack of potting soil I used. 

This is one week after planting. It germinated in about three days with it's little embryonic, cotyledon leaves. At seven days, you can see the first true leaf of my baby lettuce. It's adorable, and I can't wait 'til they're big enough so I can start munching on them. This little pot is the heart and soul of my challenge to myself: Eat what you grow!


I also wanted to introduce you to someone special. He used to be homeless, but he has taken up residence on and around our house with a bunch of his little buddies. His name is Grey. He is the cutest, feisty little kitty. He likes to take afternoon naps on my aunt's pots and squished plants. He also likes to bat with his paws whatever I dangle in front of him when I play with him after work. 


Grey is my favourite from the Cat Colony, with Spot a distant second. I tried to pet him yesterday, but I got a bit scared when after touching him with my finger, Grey turned around and started talking to me. I'm not familiar with cats at all, so I wasn't entirely sure if that meow-ing was hostile or friendly. We'll have to see how that goes.

NOTW: Splatter Nails

AKA the Graffiti Nails! These are super easy to do. I just used a straw, dipped it in my nail polish, and blew on my nails. It gets a bit messy so put something like paper towels, old newspaper or a rag on your surface. I have this huge UNIQLO catalog that I use and reuse. I love it.


This was really quick, easy and fun. I liked that no two nails were the same, and that resulting manicure had a bit of texture to it. Some might not like textured nails so that is one thing to consider. 

NOTW: Abstract Nails

Okay so I'm cheating a little here... This was actually last week's abstract nails. Oops! Not a tutorial, but there are tips down below to help out.

Another confession: I used to tape to get sharp triangles. My freehand is practically non-existent! My tape work was sloppy though, as you can see some smudges and bleeding. I used a peachy pink and a red from The Face Shop, a blue from Elianto and the green is Color Club's Wild Cactus, plus the usual OPI base and top coats.


Some tips for doing your own manicure like this:
  • Make sure each layer of polish is dry before putting on tape for the next color.
  • Use magic tape! Cello tape is too sticky.
  • Put on the lightest color first, then more opaque colors on top. Use any combo you like, go crazy!
  • You don't even have to do triangles, although it is the easiest and uses less tape. Make any geometric shape you like.
  • You can freehand your shapes, if you like! I just got lazy to tape and impatient for the polish to dry so I painted on the green immediately. You can see that it's more uneven than my reds and blues. Not a strong point for me.
  • Try to avoid getting polish on your cuticles and skin. I guess this goes for any manicure. That is my biggest waterloo. 

Color Club Wild Cactus

Just sneaking in a quick swatch after more than four months! I've been through a family ordeal, and I've only started to feel a bit normal now. As normal as it can get, anyway. 

Please excuse the sloppy painting job. I've got polish all over my skin and cuticles, meh. 


This is Color Club's Wild Cactus. I got this mini bottle of polish as an extra with my order from House of Flair. It's a good, solid emerald green, opaque with two coats. Not streaky at all! It applied very well and the consistency was good. Not thick but not too runny either. I can't remember if I put on a topcoat or not when I took the photo... Base coat was OPI Natural Nail Base Coat.

Powered By Blogger

Back to Home Back to Top Unicorns Dream. Theme ligneous by pure-essence.net. Bloggerized by Chica Blogger.