Showing posts with label nails. Show all posts

Love Flakes with Color Combos CTW511

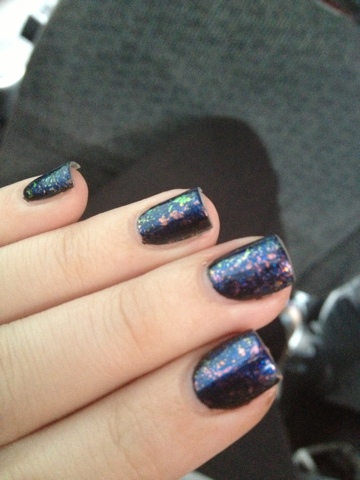
Color Combos CTW511 is a bright blue jelly with blue micro glitter and flakies. What are flakies, you ask? Flakies are little bits of iridescent film that flash different colours when hit with light. Interesting, eh? Check it out below.


The blue jelly is Color Combos CTW511 is very translucent. The base has to be, so that the flakies will show. When I first tried it, I had no idea what flakies were, so I just painted it on like regular polish. I hated it. With three coats, it looked soooo horrible. Finally, after a little bit of going around the internet, I learned that you had to paint flakies over a dark polish. I did, over black, and BOOM. Lovely! 


This particular polish's flakies flash neon green, violet, fuschia, orange and red depending on the light. It was a little difficult for me to capture it on camera, but I tried. 

The formula of the polish was great. Just the right consistency for me. The flakies painted on well too, with even distribution and no clumping at all. I also like Color Combos' brushes. They're a little similar to OPI's. These ones are a bit flat, but not as wide as OPI's. 


I bought my bottle of Color Combos at Sasa in Hong Kong. It contains 10ml and is made in France. I can't remember how much it was exactly, but it was something like a 2 for $15 or 2 for $25 deal. 

NOTW: Splatter Nails

AKA the Graffiti Nails! These are super easy to do. I just used a straw, dipped it in my nail polish, and blew on my nails. It gets a bit messy so put something like paper towels, old newspaper or a rag on your surface. I have this huge UNIQLO catalog that I use and reuse. I love it.


This was really quick, easy and fun. I liked that no two nails were the same, and that resulting manicure had a bit of texture to it. Some might not like textured nails so that is one thing to consider. 

NOTW: Abstract Nails

Okay so I'm cheating a little here... This was actually last week's abstract nails. Oops! Not a tutorial, but there are tips down below to help out.

Another confession: I used to tape to get sharp triangles. My freehand is practically non-existent! My tape work was sloppy though, as you can see some smudges and bleeding. I used a peachy pink and a red from The Face Shop, a blue from Elianto and the green is Color Club's Wild Cactus, plus the usual OPI base and top coats.


Some tips for doing your own manicure like this:
  • Make sure each layer of polish is dry before putting on tape for the next color.
  • Use magic tape! Cello tape is too sticky.
  • Put on the lightest color first, then more opaque colors on top. Use any combo you like, go crazy!
  • You don't even have to do triangles, although it is the easiest and uses less tape. Make any geometric shape you like.
  • You can freehand your shapes, if you like! I just got lazy to tape and impatient for the polish to dry so I painted on the green immediately. You can see that it's more uneven than my reds and blues. Not a strong point for me.
  • Try to avoid getting polish on your cuticles and skin. I guess this goes for any manicure. That is my biggest waterloo. 

Color Club Wild Cactus

Just sneaking in a quick swatch after more than four months! I've been through a family ordeal, and I've only started to feel a bit normal now. As normal as it can get, anyway. 

Please excuse the sloppy painting job. I've got polish all over my skin and cuticles, meh. 


This is Color Club's Wild Cactus. I got this mini bottle of polish as an extra with my order from House of Flair. It's a good, solid emerald green, opaque with two coats. Not streaky at all! It applied very well and the consistency was good. Not thick but not too runny either. I can't remember if I put on a topcoat or not when I took the photo... Base coat was OPI Natural Nail Base Coat.

Nautical NOTW: The Louis Tomlinson Inspired Nails

Ahoy mates! Sorry for the lack of updates. I've been bedridden for almost a week, and I'm due at the doctor's again tomorrow. I apologize for being incoherent now, since aside from my back pain, I'm experiencing some side effects from my meds. (mainly headaches, dizziness and nausea) For now, I offer a Nails of the Week post. Here are my rather messy Nautical Louis Tomlinson Nails:


Tada! I really like the theme of this. Stripes and an anchor, nautical, yay! But, I'm not entirely sure why I'm posting this. I think did a crap job. The dark blue base is uneven at the cuticles, and my lines are just plain weird. (Note to self: DO NOT rush a nail job late at night. You will regret it.) Kinda sad, since this was actually inspired by this photo below:

Can't remember where I got this photo. It's been sitting on my desktop for a while now.
Now, Louis "Tommo" Tomlinson is known for his love of stripes, yeah? And I really like this photo of him in particular. It helps that Liam (I like his old hair here, bless him) is holding Louis' nape while whispering in his ear. I spent most of the day in pain, and reposting One Direction stuff on Tumblr, while listening to their albums. Before I say goodbye, I present another LiLo photo, below, for good measure.

This is from tumblr. From a user named luliver or something, can't remember...

NOTW: China Glaze's Dorothy Who?

Happy new year! My first post, and it's nail polish! Surprise surprise! I've been a bit more into nails lately, and I dare say that I am a bit inspired as of late. Also, the new year brings a life changing activity I am about to complete. Weeeell, it's actually just the start, but every journey begins with the first step!


This year, let me present to you China Glaze's Dorothy Who?! It actually, really has a question mark. Anywoo, it's an old release but I just around to using it recently. It's a blue jelly with silver and blue glitter in it. Absolutely stunning! I may have messed up application a bit, and I probably needed another coat. But still, super beautiful, isn't it? Here's another photo, and maybe I need a nicer, glossier top coat.

Products I used: OPI Natural Nail Base Coat, China Glaze Dorothy Who?, OPI Top Coat
I love this! I will be wearing Dorothy Who? again in the near future. Next time with three, thicker, more even coats and hopefully, a better top coat :)

Holiday NOTW: Candy Cane Inspired

I just wanted to sneak in a quick post while everyone's in their holiday rush. Presenting my Christmas nails: Candy Cane inspired stripes! Now I know the usual candy canes are just red and white, but I decided to add some pizzaz by striping some gold glitter in there as well. I'm absolutely chuffed by how it turned out!

Products I used: OPI Natural Nail Base Coat, The Face Shop RD 301, LA Colors Art Deco in White and Gold Glitter, OPI Top Coat, 
I am a single furmom right now, just me and my five little monsters. My parents and my brother are in Hong Kong (They are very clingy! We Facetimed for 2 hours this afternoon and we are on Skype right now.) and M is in the Northern Wastelands, er, Canada, home. (Now now, that was a joke so please do not be offended.)

So there, I am alone for Christmas and I think my pudgy tummy has become less pudgy with the lack of rich, holiday food. I am currently living on fridge leftovers, but I can't complain since I have my Kewpie Roasted Sesame Dressing and crab sotanghon hotpot from Century Seafood Restaurant. Not together, of course.

So that's it! It was a bit long. Sorry for rambling. Merry Christmas everyone! Happy Holidays from me here at Unicorns Dream!

Magic in a Bottle: Color Club Polish in Magic Attraction

First of all, I have to admit that I had a Halloween design planned in my head. Unfortunately for me, the lace I was supposed to use disappeared in a smokey green *poof!* and so I settled for a non-gruesome manicure. (Translation: I lost the lace and I couldn't find it! Boo!)

Achieved with two coats of Magic Attraction 

So about Color Club's Magic Attraction. At first glance, it looks like your ordinary glitter polish. When I got it in the mail, I gave it one look and thought, "Why did I get this again?" I stuffed it in my nail polish bin and promptly forgot about it. When I couldn't find my lace, I rummaged through my stash and picked this bottle up. It has small and tiny silver holographic glitter and a sprinkling of tiny red glitter. Once I tried it on, I was stunned. It looked like crushed diamonds. Beautiful.

Magic Attraction is very easy to use, too. The brush is your regular round brush, but we can only thank the company's formula for applying like a dream. There is a ton of glitter and it applies pretty even, not like some glitters where you have bald patches on parts of a nail. Not only that, this baby dries fast. Like, super fast. I paint my right hand, and after the left, I can confidently touch, press, and even rub my right fingernails. Magic!

Photos do not do justice to Magic Attraction. Gotta see it to believe it. So beautiful.

One thing about Magic Attraction, like most glitter nail polish, is that it feels a little sandy or gritty after one swipe of top coat. Not that I particularly care about that since I love my textured nails but some people want a smooth manicure. You can probably achieve that, but with a few more layers of top coat. Oh, and I'm not sure if it's available locally. I purchased mine online and had it shipped from the US.

These were my NOTW and I still adore Magic Attraction. One week after and I have no major, yucky chips. There is nail growth as well as tip wear, but not as much as I expected since I work with my hands for my job. I have to admit, there are a few small chips in some of the nails' tips, though they are so minor that they're barely noticeable. Magic Attraction is very easy to wear! I really love it :)

NOTW+Tutorial: Cupcake Overload (Without the Guilt!)

Happy Sunday everyone! I want to share with you the nails I rocked while on (birthday) vacation in Hong Kong and Macau. I received a lot of compliments on these cute Cupcake Overload tips, from friends and strangers alike. Some of them asked if they were stickers, others thought I had them done. No, my friends, I spent some time on my butt to hand-paint both hands myself! Sorry for the uncleaned sides where the frosting went over. I hadn't had time to wipe them off before I took the photos.


Before you start your Cupcake Overload tips, protect your nails with a base coat. I used OPI's Natural Nail Base Coat. This will prevent the polish from yellowing and damaging your nails.

Next, using Revlon in Raven Red, I painted French Tips covering 1/4-1/3 of my nail. It doesn't have to be very straight or perfect, you'll be covering up the top with frosting anyway. You can use any color you want for your cupcake. I even thought of using different colors for all the tips! Maybe next time :)


Then, I used LA Colors Art Deco in Gold Glitter to define the cupcake liners. Create three to four lines per nail on the tips only.


For the frosting, I used Etude House's WH702 to frost my cupcakes. One thing to note, though. I purposely let this white nail polish of mine to thicken up a bit to make French tips easier. It wasn't as opaque as I wanted so letting it thicken made it just right. Also, don't worry if it looks kinda goopy, like in my photo below. Not all cupcakes have perfect frosting, right? Plus it adds to the character of the cute nail design.


Next, I painted on some sprinkles. I used LA Colors in Glistening Purple as glitters make the easiest sprinkles. (yes, I cheat!) Looking at my polish stash, I realized that my The Face Shop PK109 huge hexagonal glitter would make nice sprinkles too. You can also use a dotting tool with regular polish fo this.


This next step is optional, but I decided to use LA Colors Art Deco in Red to make heart-shaped cupcake toppers on each nail. I think this may have upped the cuteness factor of this Cupcake Overload nail design. 

Last but not the least, seal your cute cupcake nails in with a top coat. I used OPI's Top Coat. Don't forget to clean up any residue polish on the edges. Simply moisten a Q-tip with polish remover and wipe, wipe, wipe! I cleaned mine up after everything dried :)


It may look complicated, but it's actually really easy! You may just have to go slow on some parts, like when I was frosting my cupcakes. Also, if you don't have LA Colors Art Deco polish, you can purchase a thin tipped brush from the art section of bookstores or craft stores. I got that tip from Achi Nikki of AskMeWhats. 

So, what do you think of this Cupcake Overload, without the guilt? Sometimes when I'm hungry, I admit to staring at my nails and wishing they were real. Many people loved this! I'm glad that apart from my own glee and pride, this design put smiles on many girls' faces. Shh, I caught a few girls in Hong Kong and Macau looking at my tips. A lot of them smiled at me after, and some waved, gestured or pointed at nails. There were also two ladies who talked to me about them in Hokkien. Cute cupcakes transcends language barriers. Do jeh, girls! 

I hope you can try out this Cupcake Overload design. Have a dose of sweet, sugary goodness without the guilt!
NOTW: Chunky Pink Glitter Tips

It's been a while since I've posted about my nails. One of the issues I've been having is my USB card reader not working. Granted, I got it free when we bought our Canon Powershot G12 in Causeway Bay's Broadway store. But come on, it's Hong Kong, I kinda expected it to last longer than it did. Anyway, now that my brother's at a sleep over I've managed to hijack his laptop. Thank goodness the guest account is still active, and that there's an SD slot built in his giant Vaio. So, here are my nails!


They're really easy to do. I just put on my base coat, OPI's Natural Nail Base Coat, then painted on the pink glitter on the tips. This bottle is from my friend, who got it from Korea. It's The Face Shop, but it's not available locally. What I like about this chunky hexagonal glitter is that the tips don't have to be perfect. The line might be wonky but it still looks great.


I sealed everything with a top coat once the glitter dried. I used OPI's Top Coat. This design is awesome because you can adjust the amount of glitter you want for your tips. You can also use any color and type of glitter, whatever you have. Hex, holo, fine, mixed, bar glitter, anything goes! I hope you can try this easy nail design. Just a little effort, but you get fantastic statement nails in the end. :)

NOTW: Easter Bunnies!

Happy Easter! Today I share my Nails of the Week: Easter Bunnies! I wanted to do an Easter design, and I was inspired to draw bunnies when I saw them on Beautylish. See the little critters below!


And today, I come armed with a photo tutorial of sorts. I'm sorry, I feel really inadequate! My photos are bad, the lighting looks horrible and I don't know how to get the proper angles. Also, in my excitement, I seem to be missing some steps in photos. Sorry! I'll try harder next time. So as not to prolong your agony, let's get started!

First, prep your nails with a base coat. I used OPI's Natural Base Coat. Then I applied my favorite pearly pink from The Face Shop. I deem that pastel colors would look really good with this too.


Then, using an opaque white polish, paint some half moons on the edge of your nails. I used an Etude House polish on this one.


Using the side of your nail polish brush, paint the ears on each bunny. Let dry.


Then, get your black nail polish and paint on each bunny's face. Make two small dots for their eyes and a triangle (or a dot if you're like me!) for their noses. They don't have to be uniform and exactly the same. It adds character to your design.


Or that's just my excuse since I can't get them to all look alike. Some of my bunnies look like they're on crack or something :P


Next, using a red polish, I drew little ribbons on each bunny's left ear. Again, you can use different colors for this part or leave the little ears bare.


Once everything's dry, seal everything in with a top coat. I used my OPI Top Coat.


I can't stress how important it is to make sure it's dry! I was in a hurry with my right hand and applied my top coat right away. Two of my bunnies have streaks on them. My ring bunny looks like it's crying. My middle bunny looks like it's bleeding.


Ta-da! They're not perfect, but I love my little Easter Bunnies and I think they're all cute. So, how was your Easter? And what are you wearing on your nails? :)

NOTW: Pink 'n Glitter

Just a short, quick post before March ends! I've been really busy with work, work politics, some minor family issues (plus a bit of my own fangirling, sorry!) and other stuff so I've kinda neglected Unicorns Dream for a while now. Which I feel really guilty about. Plus, I think I may have lost the SD card which contains the photos for upcoming blog posts and reviews. I'm an idiot, I know, but I'll try to find it!

Today I present what I'm currently wearing on my nails. Ta-da!


I'm sorry for the lousy photo. Since my SD card is currently missing, I can't use the G12 to take slightly better, at-least-they're-not-blurry photos. I used my Blackberry. Anyhoo, you might remember this manicure from last year's post: Purple Glitter on Hot Pink. I knew it when I saw the effect that I'd be reusing it again. Took me half a year but hey, I love it and it's back! It's almost completely identical to last year's. The only difference is the base and top coats and the amount of glitter. I used OPI and so much less glitter. At least it won't take forever to remove! Oh, and a review of the OPI pair to come. Soon.

NOTW: Heart-y Hot Pink French Tips + New Giveaway Winners

So this post is a few weeks late. I had these nails mid-January, so I guess it's been about a month. But I think that they're pretty cute, so I decided to share them all with you. I don't know how to make tutorials, but I've included instructions with different views of my left hand. Next time I'll figure out how to do a sort of walk-through. I also decided to rename my posts Nails of the Week instead of Nails of the Day since I have them on for a week or more. (Seems kinda petty but I just wanted to point that out :P)

I always start with a base coat. This time I used The Face Shop's nail strengthener. Then I applied a pearly, translucent pink, also from The Face Shop.


Next, I painted hot pink tips. Again, this was from The Face Shop. Always wait a few minutes in between coats and colors to let the polish dry. This will make the designs more distinct. (This doesn't apply to all manicures, though. Others require you to apply while the coat is still wet.)


Then, using LA Colors Art Deco in white, I painted three hearts on each tip. Uhm, except for the pinky, only two hearts could fit. :)


After everything dried, I sealed my design with an Arezia top coat to make the polish last longer. 


My hearts are all wonky, but I loved this cute, cute design. It's so fun and girly and pink. Surprisingly, despite all the manual labor I do at work, this manicure lasted for more than a week. No major chips, just the usual tip wear I get from handling nails and paint and sand paper and other construction-y materials. 

I hope you can try these! This design was inspired by my former classmate's cute French tips. She also wore hot pink tips back then, only with white dots. I thought that I couldn't make my dots all uniform in size so I used hearts instead. Turned out to be even cuter!

Giveaway update: Kathleen and Bernadette were not able to reply to my emails. Thus, I decided, after four days of waiting for their responses, to draw new winners. Congratulations to Vince Baldonado and Zash Gepana! 

NOTD: Purple Glitter on Hot Pink

Happy Sunday evening! Hope your weekend has been better than mine. I started "getting sick" after watching the Ateneo-UST game at Smart Araneta. Thank goodness we won though, it was pretty close at the end. I was yelling and jumping and cheering and screaming at the refs but it was soooo worth it. Anyway, I think this is the first time I'll be featuring my nails in a nails of the day post. So anyway, here we go!

I clipped my nails short and filed them 'til they were in between round and rounded square shapes. (You'll sorta see what I mean in the photos.) I protected my nails with The Face Shop's Nail Strengthener as my base coat. Then, I applied two coats of The Face Shop PK106, a vibrant, hot pink. 

Taken in natural light. 
So much sunlight! Kinda hard to see the glitter, the sun reflects too much on the glossy top coat.
Then I put on LA Colors Color Craze in Glistening Purple. On my right hand (photos above), I applied two thinner coats. On my left hand (photo below), I put on one thicker, goopy coat. Both provided a decent amount of glitter, almost enough to satisfy a glitter addict like me. But I noticed that two thinner coats gave more glitter and more even coverage.  After all that dried, I painted on my top coat, Azeria nail polish 008 in Clear. 

That little wound on my left hand? I poked myself using a pair of pointed tweezers.
I'm kinda sad my G12 can't capture what my nails look like in real life. I swear they look nicer in person. I'm happy with my nails though, I'm sure I'll be wearing this polish combo again in the future.
Powered By Blogger

Back to Home Back to Top Unicorns Dream. Theme ligneous by pure-essence.net. Bloggerized by Chica Blogger.